
Before children can form small letters, cut around a shape, or fasten a button, they need many opportunities to control their fingers and hands.
Fine motor activities help children practice small, coordinated movements. The best activities often look like ordinary play: squeezing dough, picking up small objects, peeling stickers, drawing paths, and building with blocks.
The 15 ideas below use common materials and can be adjusted to your child’s ability. Supervise closely, especially when an activity includes small objects, scissors, or materials that should not be placed in the mouth.
What Are Fine Motor Skills?
Fine motor skills involve the small muscles of the hands, fingers, and wrists working together with the eyes. Children use these skills to:
- hold crayons and pencils;
- draw, trace, and write;
- turn book pages;
- use child-safe scissors;
- build with small pieces;
- open containers;
- use utensils; and
- manage buttons, zippers, and other clothing fasteners.
Fine motor control develops gradually. Large scribbles, awkward grips, and uneven cutting are normal parts of learning.
1. Roll and Pinch Play Dough
Invite your child to roll dough into long snakes, pinch tiny pieces, flatten balls, and press simple shapes.
To add early learning, form the first letter of the child’s name or make small balls to count. The resistance of the dough gives the fingers useful work.
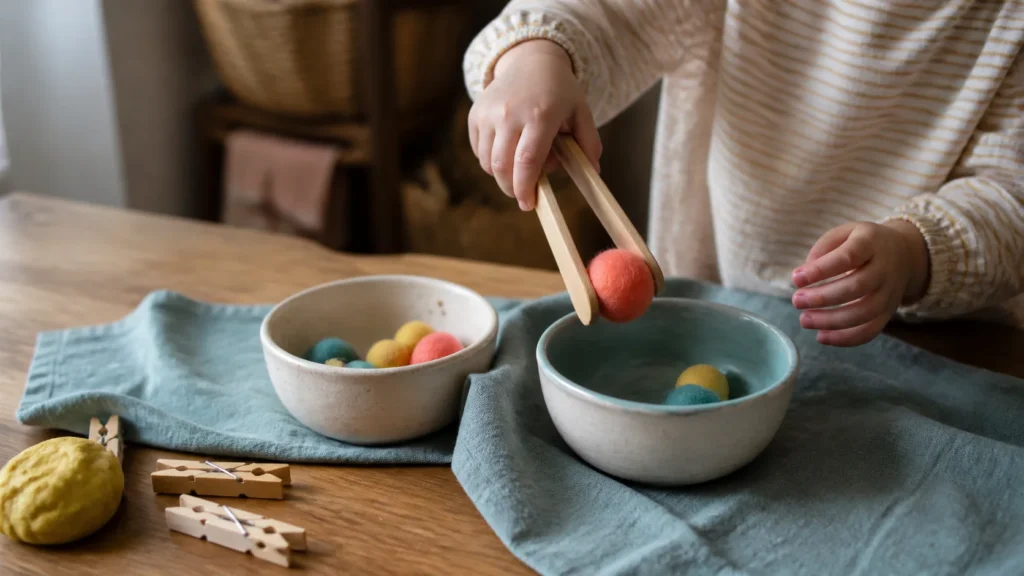
2. Move Objects With Kitchen Tongs
Place soft items such as cotton balls, large craft pom-poms, or clean rolled socks in one bowl. Ask your child to move them to another bowl using child-friendly tongs.
Begin with large objects. Smaller objects require greater control and should only be used when they are safe for your child and closely supervised.
3. Clip Clothespins Around a Container
Show your child how to squeeze a clothespin open and clip it to the edge of a sturdy box or bowl. Count the clothespins or make a simple color pattern.
If the spring is too firm, choose easier clips or let the child use both hands.
4. Tear and Glue a Paper Collage
Tearing paper requires the two hands to perform different jobs. Use old magazines, scrap paper, or tissue paper.
Let your child tear pieces and glue them inside a large outline, such as a circle, apple, or first-name initial. Use child-safe glue and protect the table.
5. Peel and Place Stickers
Peeling a sticker from its backing takes careful fingertip control. Draw several large dots or circles and ask the child to place one sticker on each mark.
You can also create a line, letter, or number for the child to cover with stickers.
6. Thread Pasta or Large Beads
Use a shoelace or thick cord with large threading pieces. Tape one end to the table so the pieces do not slide off.
Make a repeating pattern or count each piece. All materials must be large enough for safe use and handled under direct adult supervision.
7. Draw Roads and Paths
Draw two parallel lines to make a wide road. Ask your child to drive a crayon from one end to the other without crossing the edges.
Start with straight roads, then add curves, gentle zigzags, and loops. This prepares the hand and eyes for controlled tracing.
Continue with the site’s writing and tracing printables when your child is ready for more structured paths.
8. Color Small and Large Spaces
Provide pictures with a mix of open spaces and smaller details. Encourage the child to use long strokes for large areas and shorter strokes for small areas.
Do not expect perfect boundaries. The purpose is control, hand strength, and enjoyment. Browse the free coloring pages for easy practice choices.
9. Cut Along Thick Lines
Draw a thick straight line across a narrow strip of paper. Teach the child to keep the thumb pointing upward and move the paper with the helping hand.
Progress from short snips to straight lines, then gentle curves. Always use child-safe scissors and supervise directly.
10. Build With Small Blocks
Stacking, connecting, and separating blocks develops finger strength and hand-eye coordination. Challenge your child to copy a simple structure or build one using a certain number of pieces.
Avoid pieces that are too small for your child’s age or habits.
11. Open and Close Containers
Collect safe, clean containers with different lids: twist tops, flip tops, and simple snap lids. Hide a large object inside each container for the child to find.
Make sure the containers have no sharp edges and never include medicine bottles or containers that could teach unsafe access.
12. Sort Objects Into an Egg Carton
Use a clean cardboard egg carton as a sorting tray. Ask your child to place one large button, block, cap, or pom-pom in each section using fingers or tongs.
Sort by color, size, or type. Use only objects that are safe for supervised play.
13. Trace a Name in a Sensory Tray
Spread a thin layer of flour, sand, or uncooked rice on a tray. Let your child draw lines, shapes, and name letters with one finger.
Place the tray on a washable surface and supervise. For paper practice afterward, use the free personalized name tracing worksheet generator.
14. Use a Spray Bottle Outdoors
A small spray bottle gives the hand repeated squeezing practice. Let your child spray water onto a fence, chalk drawing, plant leaves, or an outdoor wall where water is safe.
Use only plain water in a child-designated bottle. Never reuse a container that held cleaning chemicals.
15. Practice Everyday Fasteners
Buttons, zippers, snaps, and hook-and-loop closures are practical fine motor tools. Place a jacket or shirt on a table at first so the child can focus on the fastener without also wearing the clothing.
Begin with large buttons and sturdy zippers. Offer help before frustration becomes overwhelming.
A Simple 10-Minute Fine Motor Routine
You do not need to complete many activities in one day. Try this routine three or four times a week:
- Two minutes of hand work: squeeze play dough or move objects with tongs.
- Five minutes of focused practice: draw a path, place stickers, cut a line, or trace a name.
- Three minutes of free creation: color, build, or make a collage.
End while the activity is still positive. Short sessions repeated over time are more manageable than forcing a long worksheet.
How to Adjust an Activity
If an activity is too difficult:
- use larger objects;
- make lines wider;
- stabilize the paper with tape;
- demonstrate slowly;
- complete part of the action together; or
- shorten the task.
If it is too easy:
- use smaller but still safe materials;
- add a simple pattern;
- ask the child to use only one hand for the tool;
- increase the length of the path; or
- combine the activity with counting or letter recognition.
Fine Motor Activities and Pencil Grip
There is no need to constantly reposition a young child’s fingers during play. Offer short crayons, small pieces of chalk, and tools that naturally encourage fingertip use.
Watch for comfort and control rather than demanding one perfect grip immediately. If writing or hand use seems painful, unusually difficult, or causes ongoing concern, discuss it with an appropriate qualified professional.
Frequently Asked Questions
How often should preschoolers practice fine motor skills?
Children use their hands throughout the day. A few minutes of intentional practice several times a week can supplement dressing, eating, building, drawing, and play.
Are worksheets enough to develop fine motor skills?
Worksheets provide useful pencil practice, but children also benefit from squeezing, building, cutting, threading, sorting, and manipulating real objects.
What should my child do before letter tracing?
Practice vertical and horizontal lines, circles, curves, and simple paths. These movements form the foundation for many letters.
Should my preschooler stay inside coloring lines?
Not perfectly. Look for improving control over time. Choose large, simple pictures before moving to small details.
Final Thought
Fine motor development does not require expensive equipment. A crayon, a piece of paper, dough, safe kitchen tools, and everyday dressing tasks can provide meaningful practice.
Choose one playful activity, keep it brief, and repeat favorites. When children feel successful, they are more willing to keep using the hands and fingers they will later rely on for writing and schoolwork.

Will Gab is the creator of Arianne Learning Printables. He started designing worksheets to support his daughter’s kindergarten learning journey. What began as a personal project has grown into a free educational resource for parents, teachers, and children around the world.
Will Gab continues to develop printable activities based on the skills young children need as they prepare for kindergarten and early elementary school.
Related Worksheets:
 Best Worksheets for Preschool: A Complete Guide for Parents and Teachers
 How to Teach Counting to Preschoolers: Fun and Easy Learning Guide
 Benefits of Tracing Worksheets for Preschool
 Alphabet Letter Tracing Worksheets A–Z
 How to Prepare My Child to Be Good at Math: 15 Simple Secrets Every Parent Should Know
 Kindergarten Readiness Checklist: 25 Skills to Practice Before School